Posts

Showing posts from March, 2017

How to create stunning charts with chart.js

Image
More and more works show easier with charts like PPT.  The API called chart.js is a responsive plugin to convert the statics to different types of charts. The Github address The full documents address Step1: Download the chart.js file from Github above address and link to the body section. Or Link from online library  https://cdnjs.cloudflare.com/ajax/libs/Chart.js/2.5.0/Chart.min.js In case the browser's version is lower than IE8 ,adding the code below to convert the canvas to VML. <!--[if lte IE 8]> <script src="excanvas.js"></script> <![endif]--> Step2: HTML layout. I got each type of charts of a canvas. html Step3: Javascript  Bulid the data with label and datasets and set two line charts. js Grab the canvas from HTML and draw the charts with type and data. js And another data source called piedata. js Other five types of charts. The total charts types are line.pie,bar,radar,doughnut and

css3 animation circle button

Image
As we know how powerful the CSS3 is ,this demo can be used for menu of the site or or share button animation. html First, we need link the bootstrap for layout easier and font-awesome for the social logo. I got from cdn library online. https://cdnjs.cloudflare.com/ajax/libs/twitter-bootstrap/4.0.0-alpha.6/css/bootstrap-grid.min.css  https://cdnjs.cloudflare.com/ajax/libs/font-awesome/4.7.0/css/font-awesome.min.css  Then forward to the body of HTML. html The navbar contains the circle in the middle and the small buttons surround it,such as the old style dial phone. The section named menu is an unordered list with nine list items which is linked to associate logos. Each logo classed the special names according to font-awesome rules. css The navbar's position is relative for all the menu and list items.And the background is an image which is changing opacity when hovering on it. All the navbar and menulists are circle shape because of border-radius. Bulid the

Countdown using JavaScript

Image
It's a clock countdown demo using JavaScript. html The concise html contains a div named container. And the input area is the place where we can set up the input text area which will be added with JavaScript. The time is for showing the countdown time section. css When hovering the input text box, the background color will turn blue. And all content keep in the middle of the site. js1 js2 The thought of the countdown clock: when the window onload, the text box and star-button should be created,meanwhile the attributes set one by one.Then insert all we created into the inputArea div in the html. When click the start button, we can triger an event named startCountdown. Getting the value of input and translating to the time to seconds. Launching the function tick every second. Taking the calculation to get minutes and seconds and display in the time section. When the remaining time goes to zero, we should reset the time section to original 00:00. See t

typeahead.js

Image
official github html html Link all the typeahead js files. js An array named cars. demo 1 is using the typeahead to select substring. When initializing a typeahead using the  typeahead.js jQuery plugin , you pass the plugin method one or more  datasets . The source of a dataset is responsible for computing a set of suggestions for a given query. js demo 2 uses the bloodhound engine searching the array list. For more advanced use cases, rather than implementing the source for your dataset yourself, you can take advantage of  Bloodhound , the typeahead.js suggestion engine. Bloodhound is robust, flexible, and offers advanced functionalities such as prefetching, intelligent caching, fast lookups, and backfilling with remote data. js demo 3 is using the prefetch to preload the json data.  Prefetched data is fetched and processed on initialization. If the browser supports local storage, the processed data will be cached there to prevent additional net

two ways of star-rating using Css or Jquery

Image
Star-rating is a popular function in interactive website,especially for movie and food.Here I learned two ways of star-rating , one of which is  using pure Css,and the other is a plugin called star-rating.js . CSS rating demo: Every star is a input radio type which has each label. We will float the label right,so make sure the html value reversed. html css css In order to make the input invisible, you can set the input aboslute on the bottom of zoom 0. Labels are the words which should be hidden and bigger.And floating right is a way to rate stars from left to right. After hidden all the relevent labels, we want show the star shape before each of the label tag. css When hovering the stars, the color turns to green,even the same with the checked labels. After checked,the stars turn red . When click the star, the one which is not checked will animate the transform scale. See the Pen css rating by Yifang Di ( @diyifang ) on CodePen . Bootstrap star-rating dem

css3 Progress based on Bootstrap

Image
Nowadays, bootstrap is kind of basic skill to be a front-end webdeveloper. But how to make it upgrade is the progressing road on. Here I will mention about the bootstrap progress functions. Progress components are built with two HTML elements, some CSS to set the width, and a few attributes. We use the  .progress  as a wrapper to indicate the max value of the progress bar. We use the inner  .progress-bar  to indicate the progress so far. The  .progress-bar  requires an inline style, utility class, or custom CSS to set their width. The  .progress-bar  also requires some  role  and  aria  attributes to make it accessible. More example of bootstrap progress. The demo Code: According to the bootstrap DOM, I build the HTML below. Every progress should be classed progress and the child bar for progress-bar,which is based on bootstrap. In this demo,we should link the Bootstrap,Awesome and customer css file. Attention:don't forget link the jquery library,because bo

Font Awesome icon content value

Image
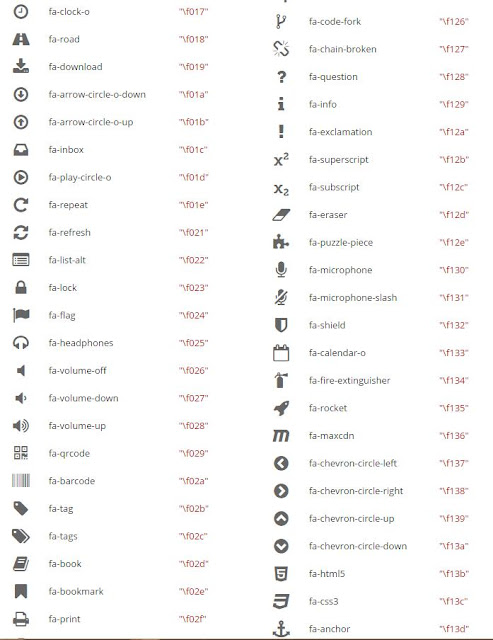
Font Awesome is a free icon especially apply to bootstrap frames. How to get start?   here You can download from the official site or link from library.,such as CDN. After you  get up and running , you can place Font Awesome icons just about anywhere with the  <i>  tag. .element {      position :  relative ; } /*replace the content value with the corresponding value from the list below*/ .element:before {      content :  "\f000" ;      font-family : FontAwesome; /*--adjust as necessary--*/             color :  #000 ;      position :  absolute ;      top :  10px ;      left :  0 ; } It is not possible to use :before or :after pseudo content on  <input>  elements.